Magento Checkout Error: PayPal gateway has rejected request.

We recently did a troubleshooting for an escalated ticket from one of our Magento clients. They were having occasionally checkout failure. Their customer reported that they ran into an error when trying to check out using PayPal. After clicking ‘Place Order’ button, they got redirected to the cart page, and an error message is showing like below:

PayPal gateway has rejected request. The totals of the cart item amounts do not match order amounts.

We did not receive the checkout failure emails from Magento. As the error message suggests, PayPal is declining the transaction because the order total does not match the total price for each product adding up together.  In other words, say you are buying item A ($1), and item B ($2), PayPal is seeing a total which is not $3.

After digging into it, we figured out this error will occur whenever the customer is checkout with a gift card applied and the rest on PayPal. Obviously, PayPal knows nothing about a gift card has been used, and total being brought down by it so it will decline the transition. The error must be cast on the PayPal side. Because we are fine using a credit card to check out.

If you have any 3rd part extension installed on your Magento that will update order total, for example, a promotion extension, which applies a discount to the order, or maybe a layaway extensin, and in our case, a gift card extension, you can possibly run into an error like this.

How to resolve it

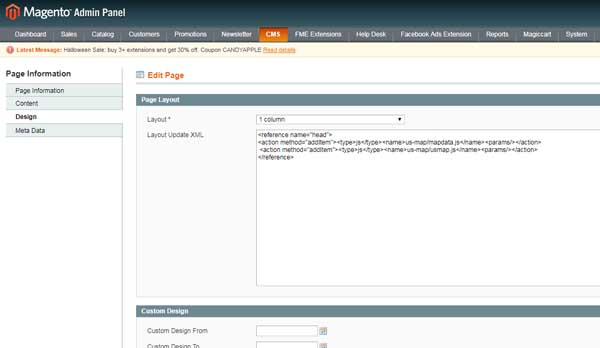
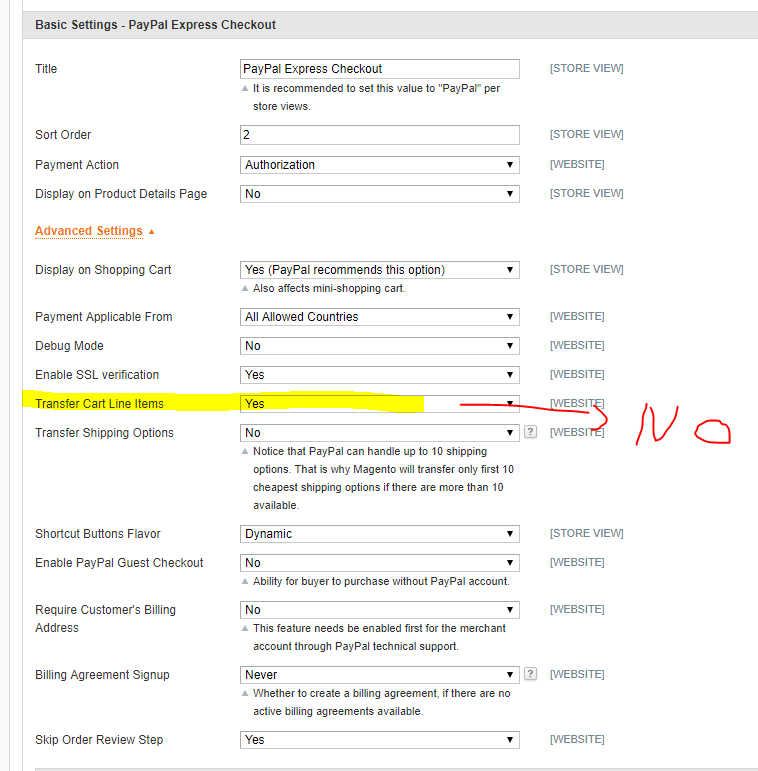
After reviewing the options for resolving this error, we decided not to debug the gift card plugin and make it  ‘PayPal compatible’. Instead, we chose to turn off the ‘Transfer Cart Line Items’ option for PayPal payment method in Magento(where to turn it off? see the screenshot below).

By doing so, the price for each item in the order will not be transferred to PayPal, and your customer will not be able to see the cart detail when they go to PayPal to finish checkout. PayPal will not notice the mismatch between order total and the sum of all items’ price. So the transaction will not be declined. This should be the most straightforward way. After we turned off the option, the error went away.

Magento PayPal gateway has rejected request. The totals of the cart item amounts do not match order amounts

I hope my post can help you when you run into a similar issue just like this. If you have noticed a different cause of this error or a different solution. Please leave a comment. Appreciate your help and time to the community!


How to add external, internal CSS and Javascript for Magento 1

How to add an external JavaScript library from a CDN for your Magento? How to link a separate CSS stylesheet to customize the frontend of your Magento store? You will probably be asking these questions once you start getting familiar with Magento developent and want to explore more!

There are many ways you can easily add JavaScript or CSS file into whatever pages you want. You can add for a CMS page, for all product detail pages, or just for your product list pages.

addCss / addJs

First, take a look at addCss and addJs Methods. Calling these two methods in your layout XML, or putting them in your layout update section for your CMS page through Magento backend, you can add CSS stylesheet or JavaScript files in HTML head section, see example code below:

Magento will search CSS stylesheet or JavaScript files from:
/skin/frontend/your_theme/default/js/your_js_folder/your_skin_js.js
/skin/frontend/your_theme/default/css/your_css_folder/your_skin_css.css

addItems

You can also use addItem method, which is a more general method and basically does the same thing.

The code above will add same CSS stylesheet and JavaScript file as addCss and addJs Methods we discussed before.
Actually take a look at <strong>app/code/core/Mage/Page/Block/Html/Head.php</strong> at <strong>app/code/core/Mage/Page/Block/Html/Head.php</strong>, you will know addCss and addJs are just wrappers of addItems method.
However, with addItem method, you may refer your JavaScript files from js directory under Magento root, see the code below

Set type to be js, instead of skin_js, or skin_css, Magento will search the JavaScript file and in /js directory of your Magento installation.
Type can also be set to js_css, link_rel or rss. We will discuss them in the future.

External JavaScript and CSS

Sometimes, you may want to refer a JavaScript file or CSS stylesheet from an external CDN, you can use the code below to accomplish this.

I suggest that the method above should only be used when you are referring an external resource. If you use it for internal JavaScript and CSS, one problem is that these JavaScript and CSS files will not got merged with others even if you turn on JavaScript and CSS merge function from Magento backend.

Adding external JavaScript libraries using Layout Updates:
Magento Add External Javascript

Magento 1 Disable Module vs. Disable Module Output

What is the difference between Disable Module and Disable Module Output in Magento 1?

One of the reasons e-retailers choose Magento is that you can install tons of powerful 3rd-party modules to improve your Magento store from the way it looks to the functionality it provides. These modules are pretty easy to install, but sometimes, you are likely to run into problems caused by these modules too. So how to disable a module in Magento 1 when the module brings in conflicts or bugs to your Magento, or you want to completely disable a module because it is no longer in use?

Completely Disable a installed module

To fully disable a module, you will need access to the code.
Go to the config file of the module you want to disable, app/etc/modules/XXX_XXXX.xml . To disable the module, you would change the active-tag from true to false (see the screenshot below).

Magenoto 1 Disable Module

You will need to flush the Magento cache afterwards.

Completely Disable a Magento module when this module is no longer in use, but you also need to make sure no other modules extend the module you are going to disable.

Disable Module Output

As the name suggest, you can also disable module output without fully disabling the module.
Navigating in Magento backend, go to System > Configuration > Advanced > Disable modules output, you can easily disable certain modules output. When you disable a module output, module will not allowed to send output to HTML.

Take a look at the toHtml() function in app/code/core/Mage/Core/Block/Abstract.php

If a module output is disabled, toHtml() simply return empty string. Better disable a module output when you would like to have the module keep running but hide the outputs. This does not mean your module is not loaded and run. Observers, rewrites, controllers will still be working in the background.

Delete All Product Images from Magento 1

Need to remove all product images from your Magento site? Want to do a site-wide product image resize to speed up your size?
Below are some ways we can accomplish this.

Remove the image product association from database

This is probably the fastest way to remove all product images for a Magento site, just follow below steps:
Truncate (delete all records from) the two tables in your db: catalog_product_entity_media_gallery, catalog_product_entity_media_gallery_value

Magento saves all product image data at those tables. catalog_product_entity_media_gallery table stores image path info,

Magento product image db table

and catalog_product_entity_media_gallery_value table holds the image order and if the image is disable.
Magento product image db table

Just log into phpMyAdmin or use MySQL console to run the SQL statement below.

Then log into Magento backend, reindex and it;s done. However this method will not delete the initial images you uploaded before. These images file will remain in media/catalog/product. You can manually delete them or use the script below to delete the image from db and file system at the same time.

Remove images and delete image files

You can run a php script, which uses Magento APIs to remove assigned images for all products, and also delete the image files on the server.

Setp 1. Create a PHP file at your Magento installation root, name it delete_image.php

Step 2. Copy and paste the code below to the PHP file

Step 3. run and execute the PHP script at www.yourmagentodomain.com/delete_image.php

This may take a bit while if you have a large catalog due to I/O tasks involved.

Also, Remember to flush the catalog image cache. System > Cache Management > Flush Catalog Images Cach

Check if a module is enabled in Magento 1

Check From Magento Backend

To check if a module is installed, or activated, first take a quick look from your Magento backend.
Go to System > Configuration > Advance (bottom left)
Then check your module name there. If your module’name is here. It is enabled. Even if you see the module output is set to disable.

Check if Magento module is enabled

How to check if a module is enabled programmatically in Magento 1?

Below is the code you can use to check if a module of your Magento is enabled or not.

isModuleEnabled function is implemented in Mage_Core_Helper_Abstract, which is located in app/code/core/Mage/Core/Helper/Abstract.php

Solution for older version of Magento

It might not be implemented in older versions of Magento, e.g. CE.1.4. If it is so, then you can use the following code to check whether a module is enabled.

When and why you need to check if a module is enabled

Checking if module is enabled is needed before you actually start using the module, for example if you want to load the helper of a module on a view, we can the use the code below,

Mage::helper('XXX_XXXX’);

But if you don’t check if the module is enabled or not before, you are likely to get an error when the module is disabled:

Class 'XXX_XXXX_Helper_Data' not found in xxxxxxxxx  on line xxxx

Note: the code above only checks if the module is enabled or installed, if will not check if the module output is enabled or not.

Magento Mage::log Function, Log Level, and Log Location Explained

Magento provides built-in API for logging. When you are developing new modules or debugging an installed module, these APIs could come in handy.

Mage::log Static Function

If you have been touching with Magento backend code, you have probably seen Mage::log() used by developers in their code. See the examples below, you can use this method to log strings, objects, arrays, etc. This static function is defined in Mage.php

Function Arguments

Take a look at the function signature of this function.

It takes 4 arguments:

The log (1) message, you can pass a string, an object, or an array. If it is an object or an array, it will call print_r function to print in a human-readable format.

The log (2) level, which is defined in lib\Zend\log.php. The default value is null,T and the function will automatically use DEBUG when it is null. In addition, you can also set log level as EMER, ALERT, CRIT, ERR, WARN, NOTICE, INFO, DEBUG.  Check out all possible log level below:

(3) File, if you don’t assign a custom log file location,  it will use default location to store log file. Mage::log function will log into /var/log/system.log; Mage::logException() will save exception printing into /var/log/exception.log

Additionally, you can change the default log locations in Magento back-end under

System -> Configuration -> Developer

Magento Enable Log

Note: see the configuration screen above. In order to store your log messages successfully. Remember if your Magento site is NOT in Developer Mode, and you set  ‘Enable’ to NO in the back-end, you will need to set the (4) forceLog to true , which is the forth argument taken by Mage:log function

However, if you are in Developer Mode, your log message should be stored successfully even if you set you set  ‘Enable’ to NO in back-end.

Mage::logException Static Function

logException function is just a wrapper of Mage::log, where level is set to Zend_Log::ERR. And file is set to default exception log location.

Usages

Last, let’s see some common usage of Mage::log function.


Programmatically Create Auto-Generated Coupon Codes in Magento 1

In Magento, you can generate batches of discount coupon codes based on a shopping cart rule from the backend.

But you may ask how I can generate coupon codes programmatically on request. For example,  you may want to automatically generate a random 10% OFF coupon codes whenever you have a new subscriber and send it to them.

This post will walk you through the essential steps to create an auto-generate coupon code in Magento.

Step 1. Create a Shopping Cart Price Rule in Magento

Before we jump onto coding,  first we will need to create a shopping cart price rule. All codes generated programmatically later will be under this rule.

If you’ve already known how to create a promo rule that uses auto-generated codes, you can skip reading this step.

Go to your Magento backend, and then find Promotions –> Shopping Cart Price Rule from the top menu.

Set up a desired rule for your promotion.  Go through the basic info of your rule, and the condition,  the discount amount. You should be familiar with these. If not, you can find some instruction here >>

A couple things we should be careful when we create the rule: see the screenshot below:

Magento auto generated coupon

1. Select Coupon drop-down to be ‘Specific Coupon‘, which means this rule will be triggered by applying a coupon in cart.

2. Check the Use Auto Generation Coupon checkbox, which means this rule uses auto-generated unique code(a random string), instead of a general coupon code.

3. We should also give Uses per Coupon 1 because each code is meant to be unique and it should be single-use only. Otherwise, the person receive this coupon can use it multiple times or even pass it to other people.

Step 2. Load the Promo Rule You Just Created

Now, it is time to write some code. First, let’s load the rule we just created:

You can find the Id of your rule in the rule list (Promotions –> Shopping Cart Price Rule), Ids are in the first column.

Step 2. Format Coupon Code

Using an array to format the code we are going to create. Basically, there are 5 arguments we can change to get a specific format:

format:  alphanumeric | alphabetical | numeric

length: the length of the code, how many characters

prefix: prefix of the code (optional)

suffix: suffix of the code (optional)

dash every x characters: insert a dash every x characters  (optional)

Let’s also specific how many codes we will generate by adding count to the array.

See the example above, below are some possible codes generated:

PRE0IY3-V2C1-L9SUF

PRE9AHH-28PC-QTSUF

PRE8JGH-ZRVW-EBSUF

Step 3. Generate Coupon Codes

Last, we need to create a generator object and then load our format setting array.

Now, we have our generator object, formatting array, and the promo rule ready. Let’s get some promo codes!

You will not need to worry about if the coupon code generated has existed before. The code generated will be unique.