How to Compress Images with Jpegoptim

Jpegoptim is a utility to optimize/compress JPEG files. You can compress JPG format image losslessly with it, or you can set a maximum quality factor to compress the images into even smaller files.

Install Jpegoptim in Ubuntu or CentOS

Ubuntu

Run the commands below to update the package list and install jpegoptim on Ubuntu.

You can check if the installation is successful by running command below to check the version.

Centos

Run the command below to update the package list and install jpegoptim on Centos.

If you are running into an error saying “no package available”, make sure you have repo epel installed and enabled because jpegoptim is a part of epel on Centos.
You can use the command below to list all the enabled repos:

If you don’t see the epel repo in the list, try the command below to enable it.

or install it

Now let’s see some common use cases below:

Losslessly Compress a Single Image

Compress Quality to 80% for all Images in a Folder

Compress Quality to 60% for all Images in a Folder That are larger than 500kb

If you will need a detailed user manual, here is a link https://www.systutorials.com/docs/linux/man/1-jpegoptim/

Magento 2 Update Product Attributes for All Products in a Certain Category

Update Product Attributes in Bulk Using Product Grid

Magento 2 gives you the ability to update product attributes in bulk. Just go to the product grid at back-end(Catalog > Products), and you can select multiple products for which you want to update the product attribute value. Then from the action drop-down menu(upper left), select “Update Attributes”. You will be brought to a product edit page, instead of updating a single product, this time you are updating for all products you have selected. Change the value of product attribute by clicking on “Change” checkbox right below the attribute you would like to update, then the attribute will become enable to accepts your updates. When you are done editing, click on save button, all products will be updated with new attribute value.

You can even apply attribute filters, e.g. availability, qty, product type, etc.

Magento 2 Update Product Attributes for All Products in a Certain Category

However Magento 2 does not allow you to search product by categories in the product grid, you are reading this post because you want to update product attributes for all products in a certain category, for example you want to disable all products in one category.

Below is a simple PHP script to do that:

  • $categoryId is the Id of the category
  • attribue_code is the attribute code(string)
  • $value is the attribute value, in the script above, I was updating a YES/NO attribute, 1 = YES, 0 = NO

Replace $categoryId, $value, attribue_code for your needs, then run the script from CLI, or directly execute it in your browser.

Magento 2 Different Ways to Load Products

How do you load product by product ID in Magento2?

Using Repository to Load Products – Recommanded

Using Factroy to Load Products

The reason to use ProductRepository’s instead of a ProductFatory’s to load the product is because the former is of a higher level than the latter.

SO, you should use the API layer whenever possible, because:

  • Api/Data layer is used in the Web Api, as well
  • models can – and probably will – be refactored at some point; Api/Data/Product will not.
  • To get a product in your classes, you need to inject either a concrete factory (ProductFactory) or an interface (ProductRepository). I don’t think you want your module to rely on anything but an interface. Hence I disagree with this type of injection.

Using Collection to Load Products

If you need to load multiple products, you should use prodcut collections.

Using Product Mode to Load Products – Deprecated

How To Install Redis and Configure Multiple Redis Server on Centos 7

What is Redis

You are reading this post, I assume you already have a bit idea what is Redis. But just a short introduction: Redis is an open source in-memory database. It supports basic data type like strings as well as advanced data structures like lists and hashes.Redis is very simple to setup and use. Below is simple instruction on how to install and configure Redis on CentOS 7.

Redis official documentation here

Installation

Run the command below to stall Redis server on Centos.

If you are running into an error saying “no package available”, make sure you have repo epel installed and enabled because redis is a part of epel on Centos.
You can use the command below to list all the enabled repos:

If you don’t see the epel repo in the list, try the command below to enable it.

or install it

Start the Redis Server

Now you can start Redis server and enable to auto-start on system reboot by using the commands below.

By default, Redis server listens on 6379 port, and you can run commands below to check if it is alive.

Install and Run Multiple Instance of Redis on Centos

Sometimes you will need multiple Redis instances, for example I was configuring a server for Magento 2 hosting, and I need 1 server for page cache, 1 for config cache, 1 for session storage.

You can run multiple Redis instances on different ports. By default Redis is installed under /var/lib/redis. This is considered as the work space for the default Redis insane. Memory dump is stored here. You will see a file named dump.rdb if there is any data dumped from memory.

First, to setup another Redis instance, we will need to duplicate the directory for a new instance. You can do so by running the commands below:

Second, we will need to create a separate configuration file. The default config file is /etc/redis.conf

And update configuration in the file to let the new instance run on different ports.

Lines need to be updated:

As you can see above, this time we are using port 6380 to host the new instance.
Then create separate service file for Centos.

Lines need to be updated in the new service file

Now it is time to start the new instance and enable to auto-start on system reboot just like what we did when we install the first instance.

Check the status or our second instance:

Now we have 2 Redis servers running separately on porst 6379 and 6380.

Can Your Store Customer’s Credit Card in Magento

The question of whether you can store credit card information within Magento comes up a lot. The answer to this question is unfortunately not very clear when looking for an answer elsewhere including on the Magento website. To clarify the answer to this question, there are a few things that need to be understood including the PCI-DSS, PA-DSS compliance and the difference between them.

What is PCI-DDS?

PCI-DSS is the compliancy of your entire online environment which includes your systems, practices, software, etc. This is the standard that is required to be able to process on-site payments. A software application can never be “PCI compliant” by itself. Magento IS PCI-DSS compliant when the rules of PCI-DSS are followed which include:

  • Build and Maintain a Secure Network
  • Protect Cardholder Data
  • Maintain a Vulnerability Management Program
  • Implement Strong Access Control Measures
  • Regularly Monitor and Test Networks
  • Maintain an Information Security Policy

What is PA-DDS?

PA-DSS is a standard for *software applications* dealing with payment processing. PA-DSS was designed to provide the definitive data standard for software vendors that develop payment applications which can store cardholder data securely and prevent them from storing prohibited cardholder data (full mag stripes, CVV2 info, pin numbers, etc).

PCI-DSS and PA-DSS Compliance

PCI DSS standards apply to each merchant who accepts payment via credit cards. There are various rules regarding the securing of credit card information depending on whether you record it on paper, in a computer, or both, and physical security rules also apply if you have credit card terminals.

PA-DSS is the certification being required for commercial applications that process credit cards. This requirement is on the software developers, not the merchants.

An application can be PA-DSS compliant, but the environment may or may not be PCI compliant.

By using a 3rd party plugin or merchant whose software and system IS PA-DSS compliant that can store cardholder data on external systems (Magento Payment Bridge included), it removes the PA-DSS requirement from Magento itself and allows you to be PCI-DSS compliant. This of course holds true if and only if all of the systems and networks this cardholder data traverse are protected. In other words, let’s say that your Magento store isn’t storing cardholder data, but is instead using a PA-DSS compliant third party. Let’s then say that the connection between your Magento store and the third-party is not encrypted or you have debugging enabled for the payment gateway. In such cases, you would NOT be PCI compliant.

Is Magento PA-DDS Compliant

Magento by itself is NOT a PA-DSS certified application. To reiterate, Magento does have the built in ability to store cardholder data in its own database, but you will never be PA-DSS compliant in doing so which prevents you from being PCI-DSS compliant. The Magento application (at any level: CE, PE, EE) has not been PA-DSS certified. Remember, PA-DSS applies to software only, and not the infrastructure. Storing cardholder data in a non-PA-DSS compliant application like Magento will invalidate PCI compliance.

If you do want to store credit card data for any time frame, even if for only a few minutes, you must use either Payment Bridge or a 3rd party plugin / service which is PA-DSS compliant and stores the cardholder information on their servers for later retrieval. In addition to this, the entire flow of cardholder data must be secured. This means all debugging must be off and the connections carrying cardholder information must use some form of SSL/TLS.

Mageno PCI Compliance

Magento Enterprise Edition

Magento Secure Payment Bridge is the easiest way to make your Magento website PCI compliant. The solution is separate from the Enterprise platform, so you don’t need a full website to be compliant. Therefore, you can easily update your ecommerce store without affecting the compliance of Bridge.

The solution stores credit card data and sends a token to the Magento instance. The token makes your system secure, as payment bridge credentials are not enough for getting access to customer data. In case of threats related to your payment bridge, you just need to setup a new instance and get new credentials. Thus, credit card information will remain secure.

Despite the Secure Payment Bridge application meets the above PCI requirements, it is not enough to make your Magento website absolutely secure, since the app must be installed in a PCI DSS compliant environment.

Magento Community Edition
Unfortunately, Secure Payment Bridge is not compatible with this edition. But there are several ways to make your Magento website PCI compliant:

You can use a third party payment methods, for example PayPal express, Authorize.net, etc.

If you choose this option you won’t have to be PCI compliant yourself, because you don’t have to store credit card information on your server. In this case you have to consider that your customers will be redirected to the site of the payment processor and will have to leave your website, which might be inconvenient and interrupt the buying process.

Magento’s Saved Credit Card Option

Again, let me first start off with the fact that this is not a PCI-compliant solution. It’s not ideal. I’d say that this is for emergencies only. And it might even be too risky for your company.

Magento Store Credit Card Option

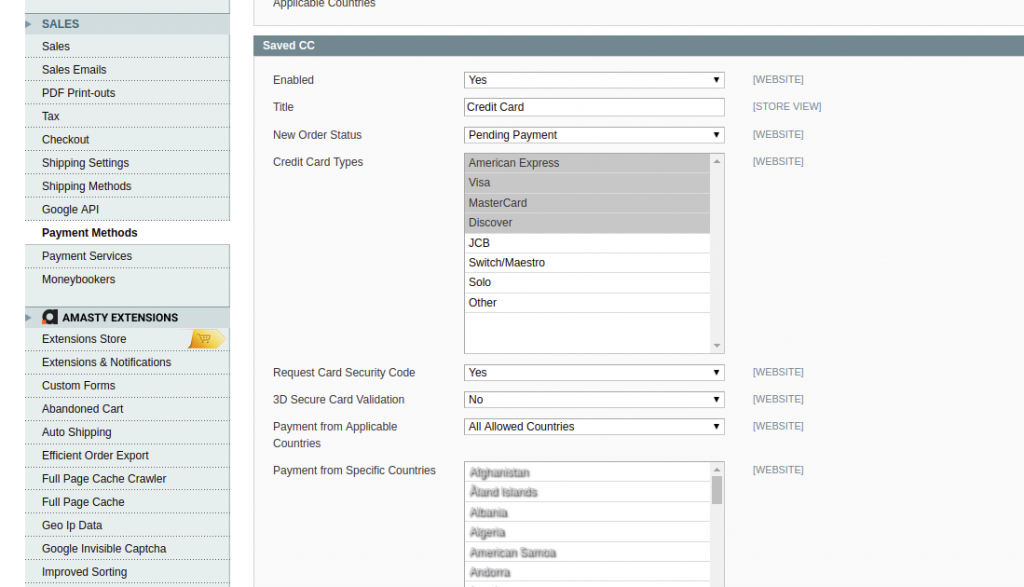
But if a payment gateway goes down completely, and you’re not able to take orders, my recommendation is to do a temporary bypass and turn on the Saved Credit Card Option.

Then, you can use a virtual terminal or other means to manually run the credit card for each order later.

Normally, the saved credit card option is something we use just for testing. It’s not as secure as using a payment gateway. It most likely goes against your merchant agreement that you signed.

But if a payment gateway like Authorize.net is down, my recommendation is to turn this on, save the credit card numbers on the site, and then run them when you are able.

You’ll want to then later remove the stored credit cards from the server, so that you can mitigate any risk of storing credit cards.