Create a Popup Overlay with CSS

Adding a popup to a website is a very common requirement when we design a website. In addition, some additional requests may include:

  • The popup should be centered both horizontally and vertically.
  • Using a fly-in effect.
  • It should overlay the existing HTML page and all elements.
  • Hide the if click detected anywhere outside of it.

In this post, we will follow a step-by-step walk-through to design a popup and meet the requirements above.

First, let’s start from placing a simple div that will center both horizontally and vertically.

Adding a div with id=popup in the body of the HTML code. Feel free to add some content in the div, of course.

Center the popup both horizontally and vertically

Using the CSS style below, we are first trying to center the popup.

Now take a look at the box model of the div, just to make sure the div is centered.
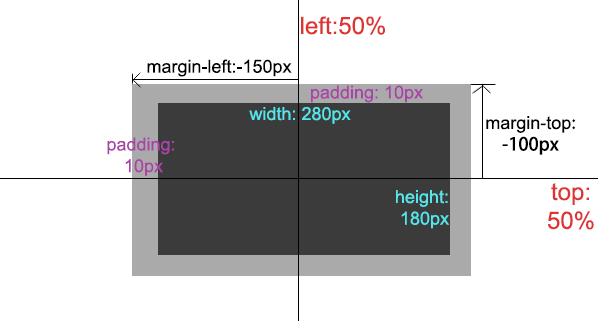
css box model


You can adjust the width and height for your div based on the content in your pop up. background-color property is set for purpose of testing.


Add a fly-in effect on the popup

Next, we can work on a fly-in effect by designing a fly-in class.

Add a Shadow Overlay

Sometimes you need your entire browser window with a black overlay in the background. So the popup in the front can draw more attention to the visitors.

We already added a fly-in class to the div to implement the fly-in effect. Now let’s create another class to do the show overlay.

Hide the popup when the user clicks outside of it

You may put a ‘Close’ or ‘X’ button in your popup, which is pretty straightforward.  So visitor can close it if they think it is disturbing.

In addition, to be more user-friendly, we want the popup to disappear from the screen when someone clicks anywhere outside the popup div. This is where javascript kicks in.

Put the javascript code below in the $( document ).ready()  function.

Basically, it adds an event handler for mouseup event on the HTML page. and if what is being clicked is not the popup div or any descendant element of it, then hide the it.


Magento Products Not Showing in Category

After working with Magento for two years, sometimes, I still find I can be surprised by it.
Why a product is not showing on the category page, I don’t how many times I have been ask this question.
Below it is a workflow I summarized we can follow to do troubleshooting.

Magento Products Not Showing in Category

Only one specific product is not showing on the category page.

If on your Magento category page, only one specific product is now showing up, other products are fine. We should consider it is something with the product itself.

Let’s do a product configuration checklist:

1. Check if the product is enabled.

2. Check if the product Visibility is set to ‘Catalog, Search’ or ‘Catalog’.

3. Check if the Stock Availability in Inventory tab is set to ‘In Stock’.

4. In Inventory Tab, ‘Qty’ should > 0, if ‘Manage Stock’ is set to Yes. If ‘Manage Stock’ is set to No, then ‘Qty’ filed doesn’t matter.

5. In the Categories Tab, the product should be assigned to the target category.

6. If you have multiple store / storeview setup, make sure the correct website is checked in the Website tab.

7. Are you using Full Page Cache? If so, try flushing the Full Page Cache.

After going through the checklist above, clear all Magento cache, preform a re-index, and then check again.

One specific category page is empty with no product, other categories load products with no issue.

First, still do the check list above, just in case all the products in the category have been misconfigured.

But be noticed, in Magento, if you go to a category page where there is 0 products assigned, you are likely to see a message like “There are no products matching the selection.”, see the screenshot below.

If you are not seeing this message, make sure the empty category page is a ‘real category page’, you are not being redirected to an empty CMS pages or anywhere else.

Also, check the ‘Display Mode’ of the category. Magento will only render the product list/grid on the category page if you select ‘Products only’ or ‘Static block and products’.

Clear Magento cache, and re-index.

All Category pages are empty, no product is showing on any category page.

In this case, you probably want to test if you can reach product detail pages.

If Product Pages cannot be reached.

This tells that Magento didn’t not find any products at all.
First of all, let’s still go through the product configuration checklist above. Sometimes, people import all products at once using csv file or other import tools, they may misconfigure some fields for all products.

After making sure product data is correct. we can now say, most likely it is an issue caused by multi-store/store view environment.
Go to System –> Manage Stores, click the store you are configuring(not website, not store view either). Please check whether your products are under the ‘Root Category’ here.

You should also try the below procedure:
Go to product grid at back-end, select all products, and then use the bulk update function at upper right. Set the Website again for all products. This is because sometimes people found product-website association is broken after they renamed their store or store view.

Clear Magento cache,and re-index, same.

If Product Pages can be reached, but no products on category page.

If you have reached here, and the issue is still not fixed, No worries. From my experience, there should be some errors in coding. First check product not showing is not caused by any CSS problems on your category page.
More likely, check if there is any error in the Catalog module, or if any 3rd-party extension overrides Catalog Module poorly.

Some possible overrides to cause the issue:

Catalog/Block/Product/List.php

Search the function getLoadedProductCollection  among all 3rd part modules for possible overrides.

Also the template files:

Catalog/Product/list.phtml
Catalog/Category/view.phtml

I hope your problem can be solved after reading this post.


Insertion Sort Algorithm

How Insertion Sort Works?

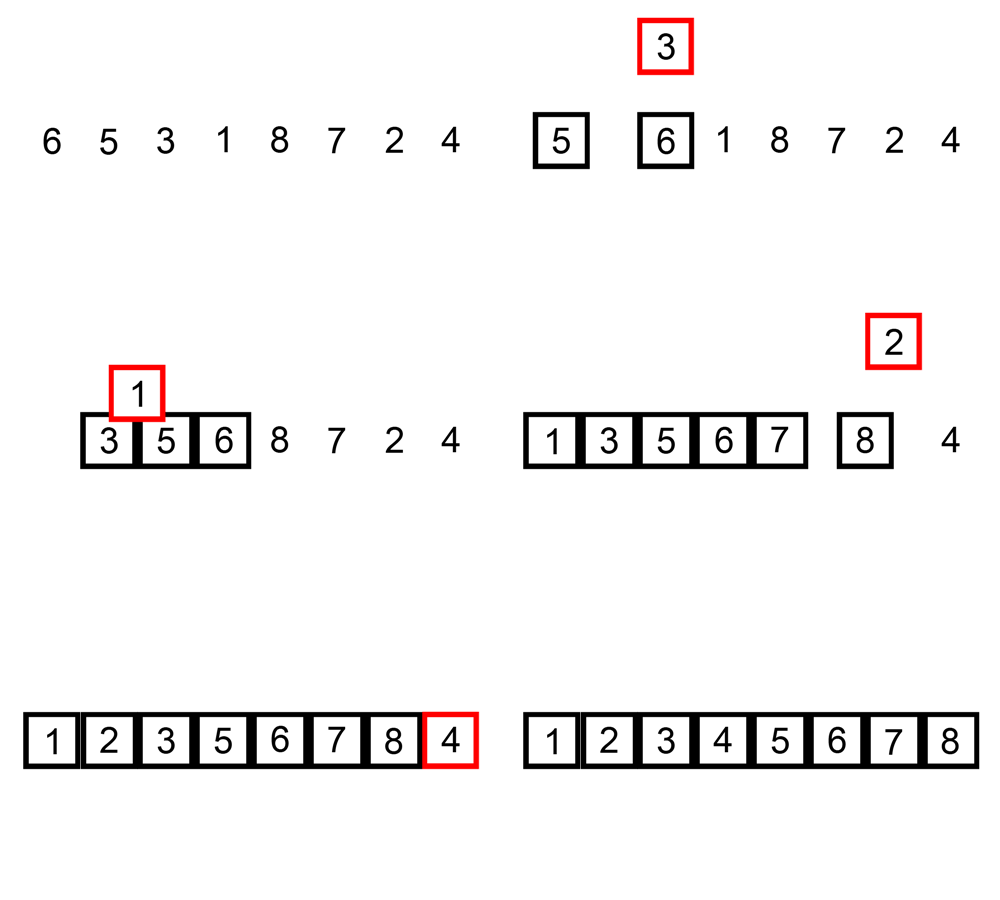
Insertion sort loops over an array. At each iteration, we will insert the element at current index into the sub-array before it. The element should be inserted at the position where the element before is less or equal to it, and the element after is greater or equal to it. So after insertion, all elements before the current index will be sorted. After we go over the entire array, all elements are sorted.

Animated GIF of the Insertion Sort

insertion sorting example

Insertion Sort Runtime  and  Space Complexity

Worst-case performance: О(n2) (array sorted in reverse order)

Best-case performance: O(n) (array sorted in desired order)

Average performance: О(n2)

Space Complexity: О(n) total, O(1) auxiliary

Insertion Sort in Java

Insertion Sort in Python

Insertion Sort in PHP

Insertion Sort in Javascript


How to Reinstall a Magento Module

Sometimes, we need troubleshooting an installed Magento Module, which you know should work perfectly, but in your case, it is not.

Doing a reinstall seems to be an option. If you installed the module using Magento connect, it is straightforward, everything can be handled via Magento back-end. However, if we installed the module manually, you will find not easy to do so.

Re-upload and Overwrite All Module Files

Replacing all files from the module may resolve the issue in the case that the issue was caused by corrupted or missing files. However, this will do nothing to the database. The existing tables and records in the database will not be updated.

Run the Database Install Script

In case something wrong with your database, e.g. dependent tables were not created in the initial install process.
We want the database install script of your module to run another time.
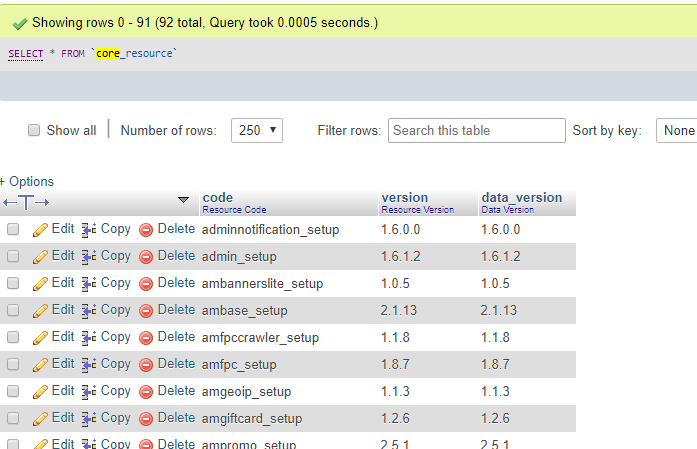
In order to do so, we will need to delete the setup record for your module in the database. Find the setup record in the core_resource table, it should look like yourmodule_setup(see the example below). Delete it with the SQL statement below, or use phpMyAdmin.

Magento core_resource table

Delete Statement:

When Magento scans file system, and find this module. Without having a setup record in the core_resource table, Magento will treat it as a new module and then run the database setup script.

However, you may also consider deleting all the dependent tables of that plugin in the database before trying re-run the script. Because the script usually uses CREATE TABLE IF NOT EXISTS statement. So it only creates the tables if it doesn’t exist before.

Clean Module Configuration

Last, if you have gone through the two steps above, and still no luck. You may try resetting the configuration of the module saved in Magento too.
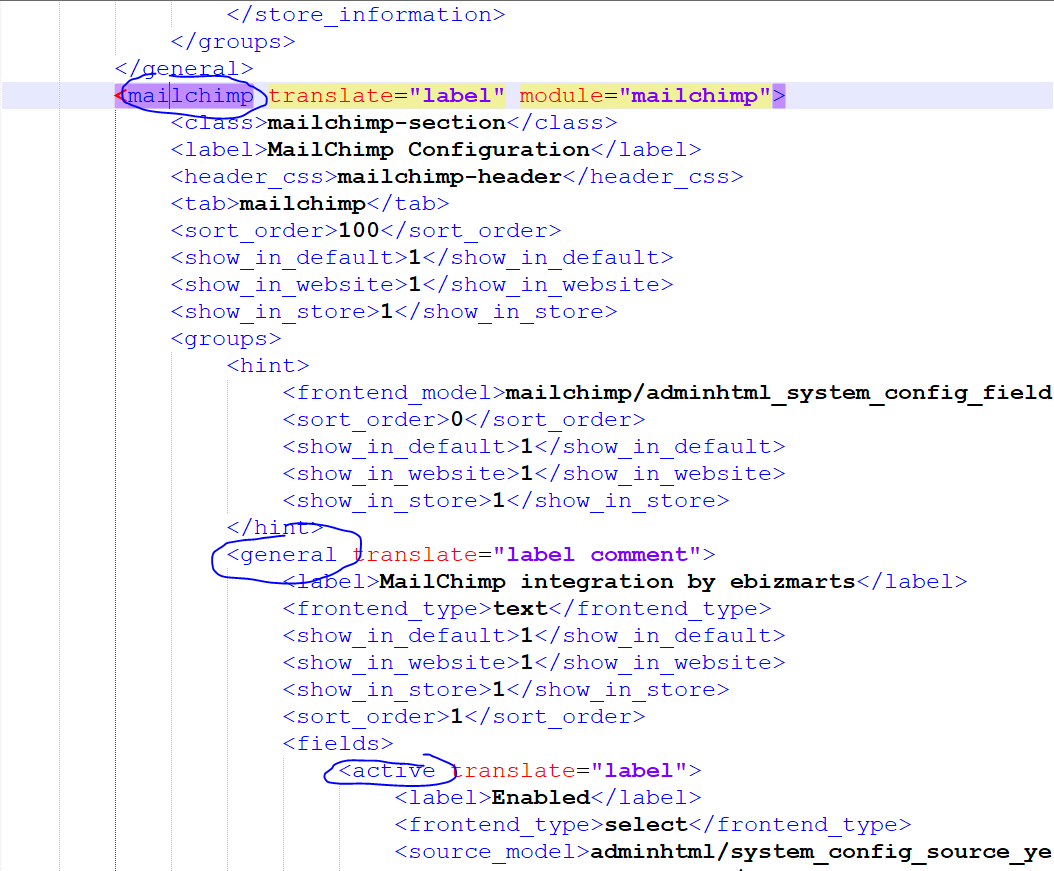
These configuration usually store in the core_config table. To find all records belong to the module, open the system.xml file of your module(etc/system.xml) and match the fields defined here with records in core_config table. See an example below

Field ‘Active’ defined in system.xml

Magento module system.xml

Record ‘mailchimp/general/active’ in core_config table

Magento core_config table

Delete all records that added by this module, and the re-do the first two steps. Then you have completed the module reinstall.